A Google Business Profile is the free listing that puts your church on Google Maps and in the local “churches near me” results — with your service times, photos, directions, and reviews shown right at the moment someone is deciding where to go on Sunday. For most churches it is the single biggest driver of first-time guests, and it costs nothing but an hour of setup.
Yet most church profiles are half-finished: wrong category, no service times, a single blurry photo, and no reviews. This guide walks through the whole thing — claiming and verifying your church, picking the right category, optimizing every section, and (the part almost no one covers) connecting your profile to your website with the right schema so Google trusts your location. There’s a free one-page checklist to download near the end.
In This Guide
- Why Churches Need a Google Business Profile
- How to Set It Up and Verify It
- Choose the Right Church Category
- Optimize Every Section
- Reviews: The Signal Churches Ignore
- Connect It to Your Website (NAP + Schema)
- What a Great Church Listing Looks Like
- Free Setup Checklist (PDF)
- Mistakes to Avoid
- Frequently Asked Questions
Why Churches Need a Google Business Profile
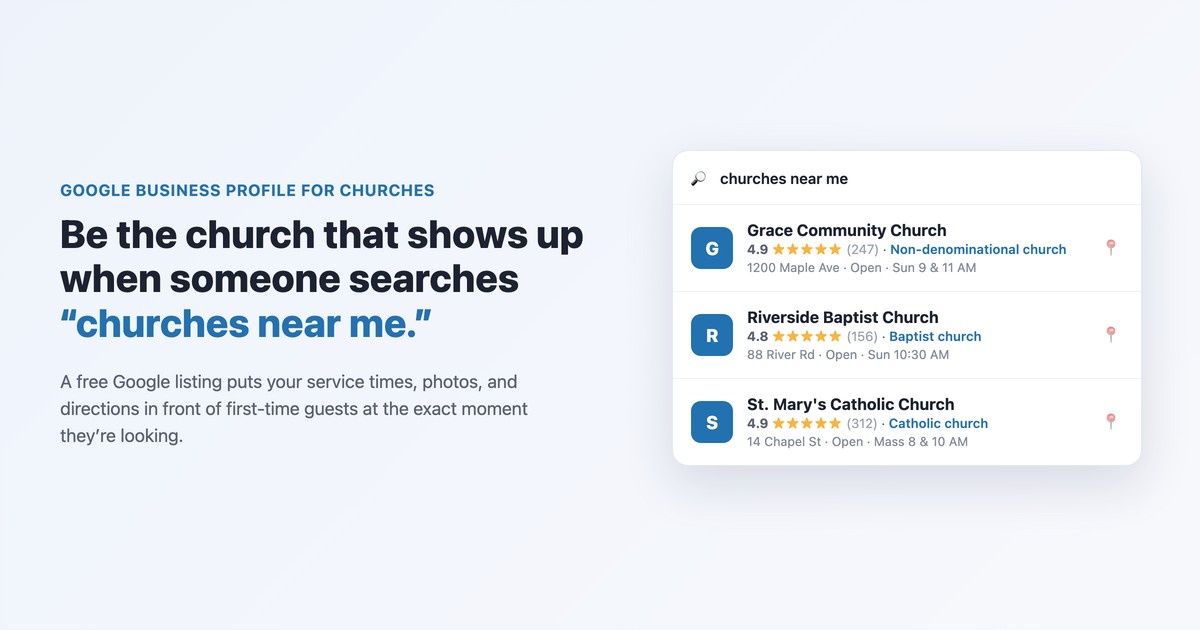
When someone new to your area searches “churches near me” or “[your town] church,” Google doesn’t show ten website homepages first. It shows a map with three highlighted listings — the local pack — pulled straight from Google Business Profiles. If your church isn’t there, you’re invisible at the exact moment a potential guest is looking.
A complete profile works for your church in four places at once:
- Google Maps — directions, hours, and photos when someone navigates to or browses your area.
- The local pack — the top-three map results for local searches, above the regular links.
- The knowledge panel — the info box on the right when someone searches your church by name.
- “Near me” and voice search — and increasingly, the AI answers that summarize local results.
It’s free, it takes about an hour, and it reaches people your website alone never will. Think of it as the front porch of your church’s online presence — your Plan Your Visit page is where they decide to come; your Google profile is how they find you in the first place. It’s a core part of the wider church website SEO strategy.
How to Set Up Your Church’s Google Business Profile
The whole setup runs through one place. Here’s the exact path.
- Go to google.com/business and sign in with the Google account your church should own long-term — ideally a shared church account, not a staff member’s personal Gmail.
- Search for your church by name and address. If a listing already exists (Google often auto-creates them), click it to claim it. If nothing comes up, choose “Add your business to Google.”
- Choose your business category. Pick the most specific one that fits (see the next section). You can add more categories later.
- Enter your exact name, address, and phone number. Use the same formatting you use on your website — this consistency matters more than it looks (more on that below).
- Verify ownership. Google needs to confirm you’re really the church at that address. Choose the method offered to you (see the table).
If a previous staff member or a third party already verified the listing, you’ll see “This profile is already managed.” Don’t create a duplicate — click “Request access” and Google will route your request to the current manager (or release it if no one responds).
Verification methods
| Method | How it works | Typical time |
|---|---|---|
| Postcard | Google mails a code to your church address; you enter it to confirm | ~5 business days |
| Phone / text | Google calls or texts a code to your listed number | Instant |
| A code is sent to your church email (when offered) | Instant | |
| Video | You record a short walkthrough showing the building, signage, and that you have access | Up to ~5 days to review |
Don’t make edits or run any promotion until verification is complete — unverified profiles can be paused. Once you’re verified, your church can appear in Maps and the local pack within a few days.
Choose the Right Church Category
Category is the most important ranking and relevance setting on the whole profile, and it’s where churches most often go generic. The rule: pick the most specific category that describes you as your primary, then add broader and related ones as secondary. A Baptist congregation should be a “Baptist church” first, not just a “Church.”
| Your church | Primary category to use |
|---|---|
| Catholic parish | Catholic church |
| Baptist congregation | Baptist church |
| Methodist / United Methodist | Methodist church |
| Lutheran (ELCA, LCMS, etc.) | Lutheran church |
| Presbyterian | Presbyterian church |
| Pentecostal / Assemblies of God | Pentecostal church |
| Anglican / Episcopal | Episcopal church or Anglican church |
| Eastern Orthodox | Eastern Orthodox church |
| Non-denominational / community | Non-denominational church |
| Evangelical | Evangelical church |
| Seventh-day Adventist | Seventh-day Adventist church |
Then add useful secondary categories where they genuinely apply — “Church,” “Religious organization,” “Place of worship,” and specific ones for what you offer (“Christian preschool,” “Wedding venue,” “Soup kitchen” for a food pantry ministry). Don’t pad the list with things you don’t actually do; relevance beats volume.
Optimize Every Section
Hours — including Christmas and Easter
Set your regular service and office hours so the profile shows “Open” at the right times. Then use special hours for the days that actually bring you the most first-time guests: Christmas Eve, Christmas, Holy Week, and Easter. Nothing frustrates a holiday visitor more than driving to a church whose Google listing showed the wrong time. Add every service (a 4 PM and a 6 PM Christmas Eve, for example) as its own entry.
Description
Write a natural 2–3 sentence description that names your city, your worship style, and who you serve — “A non-denominational church in north Austin with contemporary worship and a staffed kids ministry; everyone is welcome.” Skip the keyword stuffing; Google doesn’t use this field for ranking, but real people read it.
Photos that convert first-time guests
Photos are the most-viewed part of any listing, and “add 10–20 photos” is where most advice stops. The better question is which photos answer an anxious first-time visitor’s questions. Prioritize these:
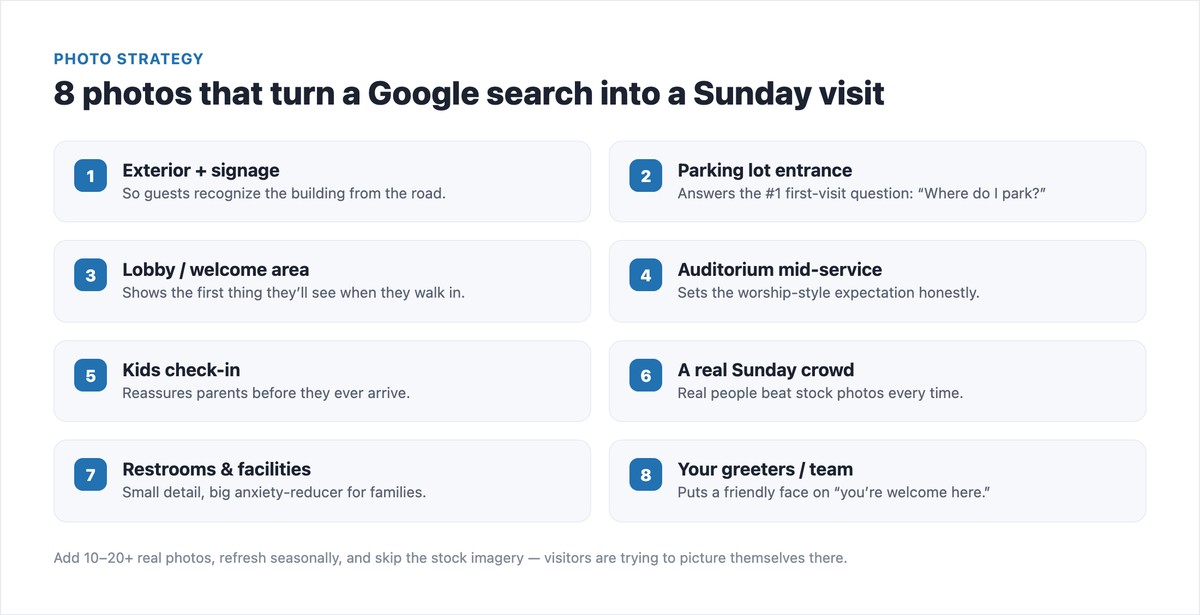
Use real photos of your actual building and people, keep them current, and refresh them seasonally. Stock imagery quietly signals that you’re hiding what the real thing looks like.
Attributes (the section nobody fills out)
Attributes are the toggles that tell guests what to expect before they arrive — and almost no church sets them. Many are the exact details a nervous or accessibility-conscious visitor is looking for.
| Attribute area | Examples to enable | Why it matters |
|---|---|---|
| Accessibility | Wheelchair-accessible entrance, restroom, parking, seating | Families who need these rarely call to ask — silence reads as “no” |
| Amenities | Free parking lot, restroom, gender-neutral / family restroom | Answers practical first-visit questions up front |
| Identity & inclusion | “Identifies as…” and LGBTQ+ friendly / safe-space attributes | A decision to make consciously — it sets visitor expectations honestly |
| Service options | Online services / live stream available | Lets people who aren’t ready to attend in person engage first |
Google Posts for events and sermons
Posts are mini-updates that show on your profile. Use them for upcoming services, special events, a new sermon series, or seasonal invitations — each with a photo and a button (“Plan your visit,” “Watch online,” “Learn more”). They keep the profile active, which Google rewards, and they show guests you’re a living, current community. Tie them to your broader church marketing rhythm so it’s a few minutes a week, not a scramble.
Reviews: The Signal Churches Ignore
Reviews drive both your ranking and a guest’s decision, and churches consistently leave this on the table — partly out of an understandable hesitation to “ask for reviews.” But there’s nothing wrong with inviting your congregation to honestly share what your church means to them.
- Invite, don’t pressure. Share your review link in the bulletin, a newsletter, or a “help newcomers find us” moment. Ask for honesty, not five stars.
- Aim for a steady trickle. Two to four genuine reviews a month looks far more trustworthy than twenty in one week. A 4.8 with real, specific reviews beats a suspicious string of 5.0s.
- Reply to every review. Thank people for kind words by name; respond to criticism calmly and graciously. Public, gracious responses are their own witness.
A simple response template for a hard review: “Thank you for sharing this honestly — we’re sorry your experience didn’t reflect who we want to be. We’d love to talk; please reach out to [email].” Calm and human always reads better than defensive.
Connect Your Profile to Your Website (NAP + Schema)
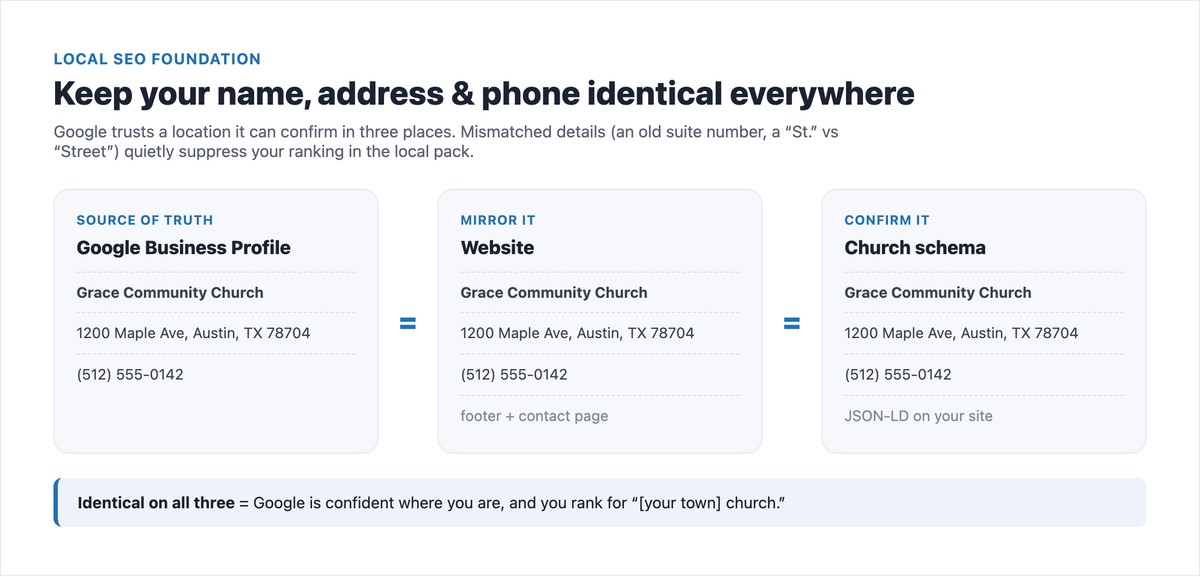
This is the step almost every church guide skips, and it’s where the real local-SEO gains are. Google cross-checks your church’s name, address, and phone (NAP) across the web. When your Google profile, your website, and your site’s structured data all say exactly the same thing, Google is confident about your location and ranks you higher locally. When they disagree — an old suite number here, “St.” vs “Street” there — that confidence (and your ranking) erodes.
Two practical steps:
- Mirror your NAP in your website footer and on your contact page, formatted identically to your Google profile.
- Add Church schema (structured data) to your site so search engines can read your details in a machine-readable form.
Here’s a copy-and-paste Church JSON-LD block. Replace the example details with yours and add it to your homepage (in WordPress, a plugin or a custom HTML block works; on most builders, paste it into a code/embed element):
<script type="application/ld+json">
{
  "@context": "https://schema.org",
  "@type": "Church",
  "name": "Grace Community Church",
  "url": "https://www.gracecommunity.org",
  "image": "https://www.gracecommunity.org/building.jpg",
  "telephone": "+1-512-555-0142",
  "address": {
    "@type": "PostalAddress",
    "streetAddress": "1200 Maple Ave",
    "addressLocality": "Austin",
    "addressRegion": "TX",
    "postalCode": "78704",
    "addressCountry": "US"
  },
  "geo": {
    "@type": "GeoCoordinates",
    "latitude": 30.2500,
    "longitude": -97.7500
  },
  "openingHoursSpecification": [{
    "@type": "OpeningHoursSpecification",
    "dayOfWeek": "Sunday",
    "opens": "09:00",
    "closes": "12:00"
  }],
  "sameAs": [
    "https://www.facebook.com/gracecommunity",
    "https://www.instagram.com/gracecommunity"
  ]
}
</script>
Every field should match your Google Business Profile exactly:
| Schema field | Matches this on your profile |
|---|---|
name | Business name (exactly) |
address | Address (same formatting) |
telephone | Primary phone |
geo | Your map pin’s latitude/longitude |
openingHoursSpecification | Service / open hours |
sameAs | Your linked social profiles |
After adding it, run your homepage through Google’s Rich Results Test to confirm it’s valid. This single addition puts you ahead of nearly every other church in your town, because almost none of them have it.
What a Well-Optimized Church Listing Looks Like
A few churches model this well — pull them up on Google Maps and study what they do:
- Life.Church (multiple campuses) — a textbook multi-location setup: each campus has its own profile with its own address, service times, and photo set, all under one consistent brand. If you have more than one location, this is the pattern.
- Saddleback Church (Lake Forest, CA) — hundreds of reviews and a deep, current photo library covering the campus, kids areas, and weekend services. It shows what a fully “lived-in” profile feels like.
- Elevation Church (Charlotte, NC) — clean per-campus profiles with distinct addresses and service times, so a search in any neighborhood surfaces the right location.
You don’t need a megachurch budget to match the fundamentals — the right category, complete hours, real photos, steady reviews, and matching NAP are all free. A well-run single-site church with 90 honest reviews at 4.9 stars outperforms a half-finished megachurch listing every time.
Free Setup & Optimization Checklist
Want this as a one-pager? Download the free Church Google Business Profile Setup & Optimization Checklist (PDF) — every step above, in a print-and-tick format you can hand to a volunteer.
Mistakes to Avoid
- Using “Church” when a specific category fits. The generic category costs you relevance for denominational searches.
- Creating a duplicate listing. If one already exists, claim it — duplicates split your reviews and confuse Google.
- Mismatched NAP. Different address or phone formatting across your profile, website, and schema quietly suppresses local ranking.
- No special hours for Christmas and Easter. Your highest-guest weekends are exactly when a wrong time does the most damage.
- Stock photos or none. Guests want to see your real building and people.
- Ignoring reviews. No reviews — or unanswered ones — reads as inactive. Invite a steady trickle and reply to all of them.
- Setting it and forgetting it. A profile that’s never updated slips in ranking. A few minutes a month keeps it strong; add it to your church website maintenance routine.
Frequently Asked Questions
Is a Google Business Profile free for churches?
Yes — completely free. Creating, verifying, and managing your church’s Google Business Profile costs nothing, and there’s no paid tier required to appear on Google Maps or in the local “churches near me” results. You only ever pay if you choose to run separate Google Ads, which is optional.
What category should a church use on Google?
Use the most specific category that fits as your primary — for example “Baptist church,” “Catholic church,” “Methodist church,” or “Non-denominational church” — rather than the generic “Church.” Then add broader and related categories (Church, Place of worship, Religious organization) as secondary. The specific primary category helps you rank for denominational searches.
How do I add my church to Google Maps?
Go to google.com/business, sign in with your church’s Google account, and search for your church. If a listing exists, claim it; if not, choose “Add your business to Google.” Enter your exact name, address, and phone, pick a category, and verify ownership by postcard, phone, email, or video. Once verified, your church appears on Maps within a few days.
How long does verification take?
It depends on the method. Phone and email verification are usually instant. Postcard verification takes about five business days for the mailed code to arrive. Video verification can take up to about five days for Google to review your recording. You can finish setting up the profile while you wait, but it won’t be public until verification completes.
Can churches have Google reviews — and should we ask for them?
Yes. Churches can receive and reply to reviews like any business, and it’s perfectly appropriate to invite your congregation to share their honest experience. Aim for a steady few reviews a month rather than a sudden burst, ask for honesty rather than five stars, and reply graciously to every review — positive or negative.
Why doesn’t my church show up on Google Maps?
The most common reasons are: the profile isn’t verified yet, it’s a duplicate of an existing unclaimed listing, your name/address/phone is inconsistent across the web, or the category and details are incomplete. Verify the listing, merge or claim any duplicates, make your NAP identical everywhere, and fully complete the profile — visibility usually follows within days.
How is a Google Business Profile different from my church website?
They do different jobs. Your Google Business Profile is how people find you — on Maps, in the local pack, and in “near me” searches. Your website is where they go to learn more and decide to visit. The two should reinforce each other: matching name/address/phone, the same service times, and a link from your profile straight to your Plan Your Visit page.
Leave a Reply